Fund Deposit Kit Widget: A Quickstart Guide
The Web3 era, with its decentralizing technologies, has immense potential to transform digital interactions. However, despite its significant potential, achieving widespread adoption of Web3 remains a challenge.
Primary barriers to mass adoption in Web3:
1.) Depositing funds on-chain
2.) Allocating the funds to the requested chain
Solving these challenges presents significant complexity and additional effort for the dApp developers. However, Aarc addresses these challenges in fund onboarding by simplifying the technical intricacies by introducing the Fund Deposit Kit (FDK). To further ease the integration process, we've introduced the React Widget, which could reduce integration time to 30 minutes, swiftly preparing you for market launch.
The Aarc FDK Widget is a React component for seamless, plug-and-play integration. It offers all essential workflows to enable users to onboard funds directly into wallets within the dApp's UI, eliminating the need to navigate away from the application.
Navigating the User Flow: What to Expect
Aarc has enhanced the user experience by offering a one-step fund onboarding process that mirrors the convenience of web2.
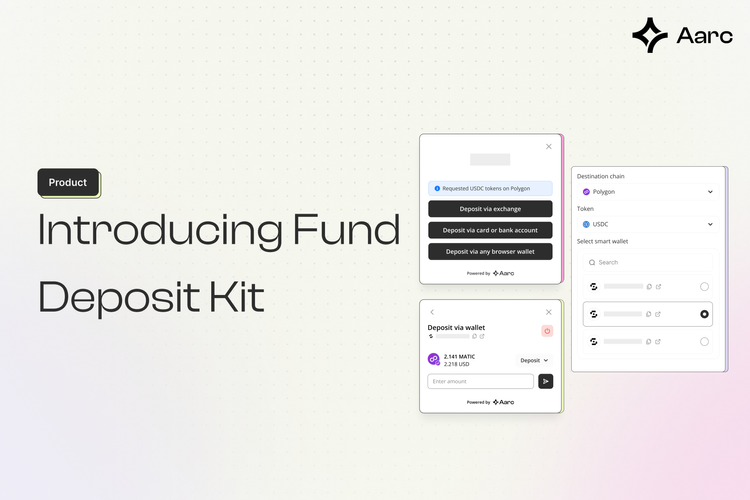
The Fund Deposit Kit allows users to deposit funds directly into their embedded or smart wallets through 3 main pathways:
1.) Deposit via exchange: Widget streamlines moving funds from Centralized Exchanges (CEXs) to embedded wallets in dApps. It enables users to authenticate their CEX accounts from the dApp's interface, facilitating a smooth, single-step transfer of funds directly into the embedded wallets without the hassle of navigating different platforms.
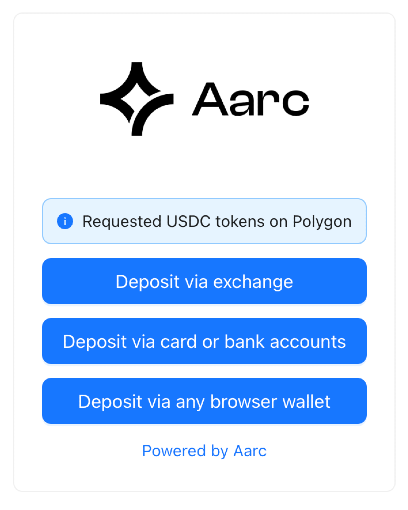
2.) Deposit via card or bank accounts: Widget allows dApp users to deposit the required tokens directly into their wallets by purchasing them with a Credit/Debit Card.
3.) Deposit via any browser wallet: Widget offers a streamlined solution for dApps to facilitate asset transfers from browser-based wallets to smart accounts, enabling cross-chain/token deposits, cascaded signatures for simplified transactions, and gasless deposits on specific tokens.
Why Wait? Head Here for Quick Integration Steps 👇
Prerequisites
Before proceeding with this tutorial, make sure you understand the following prerequisites:
Getting Started
We will build a Next.js application that utilizes:
- The Aarc Widget for seamless onboarding.
- RainbowKit for wallet connection.
1.) Create a Next.js application
npx create-next-app aarc-widget-tutorial
Select the following for this tutorial :
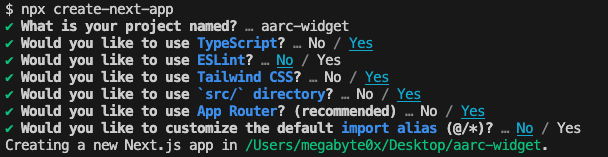
2.) Install the Aarc Widget and other dependencies
npm i @aarc-xyz/deposit-widget @aarc-xyz/deposit-widget-coinbase @aarc-xyz/deposit-widget-transak @rainbow-me/rainbowkit wagmi viem@2.x @tanstack/react-query antd
3.) Click Here to Obtain Your API Key for Enhanced Widget Functionality
Exploring Aarc Component
It's time to incorporate the component to streamline user onboarding.
- Open
src/app/page.tsx - Import the following at the top of the file
'use client'
import { useAarc, AarcProvider } from '@aarc-dev/deposit-widget';
import { QueryClient, QueryClientProvider } from '@tanstack/react-query';
import '@aarc-dev/deposit-widget/dist/style.css';
// For Coinbase Exchange
import Coinbase from '@aarc-xyz/deposit-widget-coinbase'
// For Transak On-ramp services
import Transak from '@aarc-xyz/deposit-widget-transak'
import { WagmiProvider, createConfig, http } from 'wagmi'
import {  polygon } from 'wagmi/chains'
import { message } from "antd";
import Link from "next/link";- Prepare the configs.
AarcProviderrequires configs that include the following:
const aarc_config = {
    modules: {
        Transak: function (props: any) {
        return <Transak {...props} />
        },
        Coinbase: function (props: any) {
        return <Coinbase {...props} />
        },
    },
    destination: {
    chainId: number,    // Chain Id of the network where you want to accept the tokens.
    tokenAddress: string,  // Address of the token which you want to accept.
    walletAddress: string, // Wallet address where you want to accept the tokens.
    tokenSymbol: string,
    tokenDecimals: number,
    },
    appearance: {
    logoUrl: string,
    themeColor: string,
    },
    apiKeys: {
    aarcSDK: "AARC_API_KEY",
    },
    onTransactionSuccess: (data: any) => {
        // Logic after successful transaction
        console.log(data)
        message.success('Transaction successful')
    },
    onTransactionError: (data: any) => {
        // Logic if a transaction error occurs
        console.log(data)
        message.error('Transaction failed')
    },
    onWidgetClose: () => {
        // Logic on Widget Closing
        console.log('Widget closed')
    },
    onWidgetOpen: () => {
        // Logic on Widget Opening
        console.log('Widget opened')
    }
};
Since we are building a static flow, for example, purpose, therefore we can use the following configs:
const config = {
  modules: {
      Transak: function (props: any) {
          return <Transak {...props} />
      },
      Coinbase: function (props: any) {
          return <Coinbase {...props} />
      },
  },
  destination: {
      chainId: 137,
      tokenAddress: "0x2791bca1f2de4661ed88a30c99a7a9449aa84174", // USDC
      walletAddress: "YOUR_ADDRESS",
      tokenSymbol: "USDC",
      tokenDecimals: 6,
  },
  appearance: {
      logoUrl: "demo.aarc.xyz/AarcLogo.png",
      themeColor: "#1677FF",
  },
  apiKeys: {
      transak: "your-transak-api-key",
      aarcSDK: "YOUR_AARC_API_KEY",
  },
  onTransactionSuccess: (data: any) => {
      // Logic after successful transaction
      console.log(data)
      message.success('Transaction successful')
  },
  onTransactionError: (data: any) => {
      // Logic if a transaction error occurs
      console.log(data)
      message.error('Transaction failed')
  },
  onWidgetClose: () => {
      // Logic on Widget Closing
      console.log('Widget closed')
  },
  onWidgetOpen: () => {
      // Logic on Widget Opening
      console.log('Widget opened')
  }
  }
The WagmiProvider requires the following config:
const wagmiConfig = createConfig({
    chains: [ polygon],
    transports: {
        [polygon.id]: http('https://mainnet.example.com'),
    },
})
4. Add the Hooks in the application.
function Home() {
    const open = useAarc();
    const queryClient = new QueryClient();
    return(
    // rest of the code
    );
}
openwill be used to call theuseAarchook to open the Aarc Widget.queryClientis required for theQueryClientProvider.
5. Add the component to the application.
export default function Home() {
    const open = useAarc();
    const queryClient = new QueryClient();
    return (
        <WagmiProvider config={wagmiConfig}>
            <QueryClientProvider client={queryClient}>
                <AarcProvider config={config}>
                // The Boilerplate code
                </AarcProvider>
            </QueryClientProvider>
        </WagmiProvider>
    );
}
- Now, your dApp is ready to work with the Aarc Widget.
At the end, yourpage.tsxshould look like this:
 "use client";
import { useAarc, AarcProvider } from "@aarc-dev/deposit-widget";
import "@aarc-dev/deposit-widget/dist/style.css";
// For Coinbase Exchange
import Coinbase from '@aarc-xyz/deposit-widget-coinbase'
// For Transak On-ramp services
import Transak from '@aarc-xyz/deposit-widget-transak'

import { QueryClient, QueryClientProvider } from "@tanstack/react-query";
import { WagmiProvider, createConfig, http } from "wagmi";
import { polygon } from "wagmi/chains";
import Link from "next/link";
import { message } from "antd";

const wagmiConfig = createConfig({
    chains: [polygon],
    transports: {
        [polygon.id]: http("https://rpc-mainnet.maticvigil.com/"),
    },
});
const AARC_API_KEY: string = process.env.NEXT_PUBLIC_AARC_API_KEY ? process.env.NEXT_PUBLIC_AARC_API_KEY : "";

const config = {
    modules: {
        Transak: function (props: any) {
        return <Transak {...props} />
        },
        Coinbase: function (props: any) {
        return <Coinbase {...props} />
        },
    },
    destination: {
        chainId: 137,
        tokenAddress: "0x2791bca1f2de4661ed88a30c99a7a9449aa84174",
        walletAddress: "0x1Cb30cb181D7854F91c2410BD037E6F42130e860",
        tokenSymbol: "USDC",
        tokenDecimals: 6,
    },
    appearance: {
        logoUrl: "https://raw.githubusercontent.com/megabyte0x/aarc-widget-tutorial/main/src/app/aarc.png",
        themeColor: "#1677FF",
    },
    apiKeys: {
        transak: "your-transak-api-key",
        aarcSDK: AARC_API_KEY
    },
    onTransactionSuccess: (data: any) => {
        // Logic after successful transaction
        console.log(data)
        message.success('Transaction successful')
    },
    onTransactionError: (data: any) => {
        // Logic if a transaction error occurs
        console.log(data)
        message.error('Transaction failed')
    },
    onWidgetClose: () => {
        // Logic on Widget Closing
        console.log('Widget closed')
    },
    onWidgetOpen: () => {
        // Logic on Widget Opening
        console.log('Widget opened')
    }
};

export default function Home() {
const open = useAarc();
const queryClient = new QueryClient();
    return (
        <WagmiProvider config={wagmiConfig}>
        <QueryClientProvider client={queryClient}>
            <AarcProvider config={config}>
                // boiler plate code
            </AarcProvider>
        </QueryClientProvider>
        </WagmiProvider>
    );
}- Create a Button to Open the Aarc Widget:
Remove the boilerplate code and add the following button to initiate the Aarc Widget.
<button onClick={open}>Open Aarc Widget</button>
Now, your application is ready to work with the Aarc Widget.
Thank you for building with us! To delve deeper into the Aarc Fund Deposit Kit SDK
We're here for you! Feel free to reach out if you have any questions or want to discuss anything.